3 min readMay 4, 2024
Efficient Background Task Handling in Flutter: A Step-by-Step Guide to Setting Up Work Manager
Here, we’ll quickly go through steps to set up background tasks in Flutter using Workmanager, exploring its various features such as scheduling tasks periodically and applying constraints for task execution. Dive into efficient background task management for an enhanced app experience.

Firstly, Get workmanager package in your app 📦
$ flutter pub add workmanagerSetup ⚙
- For Android, make sure you have the following in your
AndroidManifest.xmlfile. If not, Consider upgrading your project.
<meta-data
    android:name="flutterEmbedding"
android:value="2" />- For IOS, follow these steps.
- While developing, to keep debugging easier keep
isInDebugModetrue, which will push a notification when the background task is executing.
Basic Implementation of Basic Background Functions 📐
- Add
callbackDispatcher()as given in the following code which will be the entry point for background functions. - In
main()of application, initialize work manager also passcallbackDispatcher - We can initiate a one-time background task by using
registerOneOffTask()function of the work manager, and pass the unique task name along with the normal task name. - Inside
calbackDispatcher(), we will get the name of the task which we will execute in the background under theexecuteTask()of workmanager. - The function should return the future of the boolean where if the task executes successfully we can return true else false which will indicate the function did not execute successfully and the workmanager will try again to execute it successfully.
- Refer following code to understand how to implement basic functions in the background.
Providing Data for Background Function 📩
- While initiating the background function, we can pass some data to that specific function as follows -
Workmanager().registerOneOffTask(
  'uniqueTaskId', // unique name/id for particular task
  'taskName',
  inputData: {'key': 'value', 'key1': 'value'}, // takes input in Map
);
Specifying Constraints 📳
- We can specify exactly when we want to initiate a specified background function.
- For example, as given in the above code, the given function will only execute if a device is connected to the network.
constraints: Constraints(
  networkType: NetworkType.connected, // will initiate only if network is connected
),- We can specify multiple constraints like
requiresBatteryNotLow,requiresCharging, etc.
Executing a Function Periodically in Background (Android) ⏲
- To call function periodically at a certain duration, we can use
registerPeriodicTask()function of work manager. - Similar to
registerOneOffTask(), pass the unique task name along with the normal task name as params. - We can set a specific duration after which the task will execute again & again (By default this is set to 15 minutes). We can specify the duration as given -
Workmanager().registerPeriodicTask(
  'uniqueTaskId', // unique name/id for particular task
  'taskName',
  frequency: const Duration(minutes: 21), // set custom duration
);- The Minimum required duration is 15 minutes.
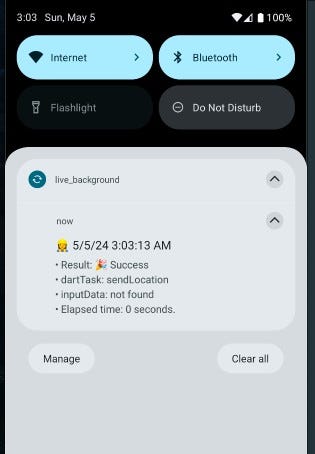
- We will get a notification every time while function executes in the background when the app is closed.
Killing Background Tasks ⛔
- A task can be canceled using a unique task name that we have specified while initiating the task.
Workmanager().cancelByUniqueName("uniqueTaskId");- We can cancel all running tasks at once.
Workmanager().cancelAll();
That’s all for now. Thank you for reading this article😉.
Keep an eye out for my next article, where I’ll dive into the fetching location in the background.
See you next time 👍.
![Setting Up home_widget in Flutter [android — XML/Glance]](https://miro.medium.com/v2/resize:fit:679/1*3ge1xlDsTi5l9ST7uhXQ3g.png)